Introduction
Windows 8 adds a new mode to the traditional desktop that is familiar to Windows 7 users. The Start Screen and Modern Style apps (formerly known as Metro Style) provide a touch–screen-friendly environment that is seamless across various devices, including desktops, laptops, smartphones, and tables running the Windows 8 operating system. This lesson provides an overview of working effectively within the Windows 8 operating system for students who may not be familiar with the new OS.
- Explain the differences between Windows 8 (Modern style) apps and traditional desktop programs.
- Explain the differences between Window 8 RT and Windows 8.
- Customize the Lock Screen.
- Customize the Start Screen by rearranging and resizing tiles.
- Access the Charms Bar and App Bar areas of an app.
- Install an app from the Windows Store.
- Overview of the Windows 8 Operating System
- Customizing Windows 8
- The Windows Store
- The Lock Screen (1:19)
- The Login Screen (3:18)
- The Start Screen (3:41)
- The Charms Bar (1:53)
- The App Bar (1:41)
- Switching Between Apps (1:25)
- Snapping and Unsnapping (2:15)
- The Desktop Mode (1:35)
- Modifying the Lock Screen (1:30)
- Changing the Start Screen Background (0:45)
- Customizing the Start Screen (2:01)
- Browsing the Windows Store (3:41)
- Installing an App (1:23)
- A History of Windows – Provides a history of Windows Operating systems
- Try It Out: Sideload Windows Store Apps
- Quiz Lesson 1
- Assignment 1A: Compare hardware ads for Windows 8 devices
- Assignment 1B: Create a handout on Windows 8 Modern Apps vs. Traditional Desktop applications
- Assignment 1C: Customize the Lock Screen and Start Menu
- Assignment 1D: Install an app from the Windows Store
Instruction
Everyone has an opinion on Windows 8, the newest operating system from Microsoft. Desktop traditionalists largely prefer the old Windows 7 environment, while tablet users and those with touch screen laptops laud the new user interface and the support for touch actions and gestures. Regardless of your opinion, there is a great market for the developer to tap into the new Modern style apps sold through the Windows App Store.
This lesson will introduce you to Windows 8 operating systems and the unique features of Windows 8 apps. You will see that there are three consumer versions of Windows 8. (There actually is a fourth version for business enterprise solutions.) You will learn how to customize the Lock Screen and Start Screen, as well as how to navigate the new operating system (OS) and access features of the Charms Bar and App Bar. Finally, you will explore the Windows Store and see how easy it is to download and install new apps to your device.
For clarification, you will use "apps" to refer to Modern (Metro) style apps designed for Windows 8 and "programs" or "applications" to refer to traditional software designed for previous versions of Windows or those that run in the Desktop mode.
Overview of the Windows 8 Operating System
Why Windows 8?
Microsoft has a history of favorable and unfavorable customer reactions when introducing a new or upgraded operating system. And of course, everyone is entitled to an opinion. Most recently, Windows Vista (2006) was largely jeered by consumers while Windows 7 (2009) was applauded. Since this latest version (Windows 7) has been viewed so favorably, why risk an upgrade that makes significant changes? The answer is the increase in tablet sales and the decline of PC sales. Apple iOS and Android have to this point captured the vast majority of tablet sales. With Windows 8, Microsoft is attempting to do something that even Apple has not accomplished—provide a seamless operating system experience between desktop and mobile devices.
Specifically, Windows 8 offers the following:
- Seamless Experience Across Devices – It looks and operates the same on desktop, laptop, smartphone, and tablet devices.
- Improved Speed – The modern style apps (designed for Windows 8) respond astoundingly fast.
- Backwards Compatibility – Windows 8 Pro includes a more traditional desktop for those who prefer the Windows 7 experience and wish to run older (non-Windows 8 specific) applications. In this mode, Windows 8 (but not Windows 8 RT) can run all your old programs.
- Touch Friendly – Make no mistake about it, Windows 8 was designed with mobile devices and touch-screen-equipped laptops and desktop monitors in mind, but the OS does work with keyboard and mouse navigation as well.
- App Store Deployment – It was modeled after the highly successful Apple App Store and Google Play store for Android. It provides instant access to thousands of applications and games.
- Antivirus software – There is antivirus software built in, whereas Microsoft previously relied on third-party installation
- Cloud Friendly – It was built to store information and data online, making it easy to share data between devices.
- Live Tiles – The Start Screen provides for dynamic, up-to-date, live information such as news headlines, sports scores, weather data, and stock market results.
Understanding the Versions of Windows 8 and Microsoft Tablets
When Microsoft released Windows 8 in October 2012, they also entered the mobile device market with their own tablet, the Microsoft Surface RT.
The Surface RT featured an ARM (originally Advanced RISC Machines) processor as the CPU, which is what most mobile phones and tablets used. Accordingly, the Surface RT was aimed at a consumer market and featured the Windows 8 RT operating system. When the Windows 8 RT operating system is coupled with the ARM processor, it is not capable of running traditional Windows 7 desktop applications as its bigger brother—the Windows 8 operating system has this capability.
Windows 8 RT is designed to run apps designed for Windows 8, which were designed with the Modern or Metro style design. The same holds true of other manufacturers of tablets and smartphones running the RT operating system. The Office suite (with Word, Excel, and PowerPoint applications) is included in Windows RT.
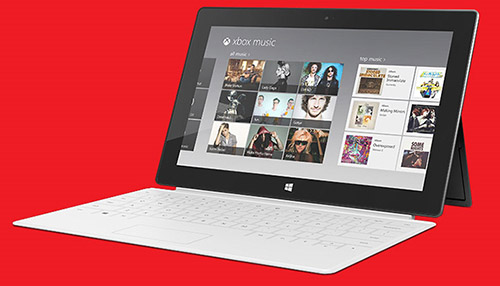
Figure 1 – Microsoft Surface Pro tablet
For desktops and laptops there are three versions of the Windows 8 operating system in addition to the Windows 8 RT version for tablets and phones. The core Windows 8 operating system is aimed at home and educational markets. It provides the same experience as Windows RT with the ability to execute older Windows 7 software in the desktop mode.
The Windows 8 Pro version is aimed at business users. It extends Windows 8 with the ability to communicate within a Windows Server Domain, connect to a Remote Desktop host, and utilize an encryption technique called BitLocker. A further enhanced Windows 8 Enterprise version is aimed at enterprise customers needing some specialized IT administration capabilities.
In February 2013, Microsoft released the Windows Surface Pro tablet that includes an Intel CPU chip and runs the full version of Windows 8 Pro. This tablet is able to execute traditional Windows 7 software in the desktop mode. The Surface Pro is the first tablet capable of replacing desktops and laptops.
The following table summarizes the differences between Windows 8 versions:
Comparison Between Windows 8 Operating Systems
| Windows RT | Windows 8 | Windows 8 Pro | Windows 8 Enterprise | |
|---|---|---|---|---|
| Target audience | Mobile Consumer | Home/School | Business | Large Business |
| Execute Windows 8 apps | Yes | Yes | Yes | Yes |
| Execute Win7 desktop apps | No | Yes | Yes | Yes |
| Remote desktop, Windows server domain access | No | No | Yes | Yes |
| VPN-like, centralized access capable for IT support | No | No | No | Yes |
The Lock Screen
When first booting a Windows 8 device, the first screen you will encounter is the Lock Screen. It is nothing more than an entry point with some basic (customizable) information. Typically, it shows the data, time, and the battery level (for a mobile device). It might also show your location, weather information, Wi-Fi connection information, and so on.
The purpose of the Lock Screen is that many users often power up their tablets or phones to check the time, see if they have new email, check the latest weather alerts, or view the most recent sports scores. The Lock Screen provides this basic access without requiring you to first login. The Lock Screen appears whenever you boot your device or when you wake it from sleeping. You also can navigate to it by pressing the Windows key with the letter L.
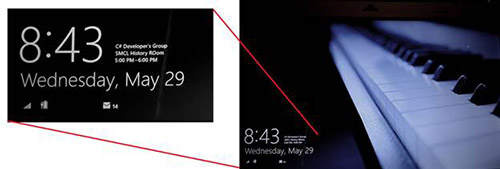
Figure 2 – The Lock screen (right) with notification detail expanded. The Lock Screen shows the date. At the bottom, the wifi signal strength and battery level (plugged in) are shown as well as any added lock screen badge apps. (Here an email badge is displayed, showing the number of unread inbox messages.) The calendar detail is shown here because the Calendar app was chosen as the detailed status app.
To navigate past the Lock Screen, do any of the following:
- TOUCH: Swipe up with your finger
- MOUSE: Click the mouse
- MOUSE: Move the mouse scroll wheel
- MOUSE: Drag up with the mouse
- KEYBOARD: Press any key
View "The Lock Screen" video (1:20), which demonstrates how to use the lock screen.
The Login Screen
Navigating past the Lock Screen brings you to the Login Screen. The purpose of this screen is to provide a level of protection from unauthorized access. It also allows multiple users on the same device to utilize their specific settings and customizations. There are three options for logging in with a specific user ID:
- Establish and use a traditional password (relatively secure)
- Establish and use a 4 digit security number (not very secure)
- Establish and use an image password consisting of specific tough gestures over an image of one's choice. (Least secure but aimed at mobile devices where touch gestures may be easier than typing)
As with the Lock Screen, it is possible to disable the Login Screen from the boot/awaken from sleep processes.
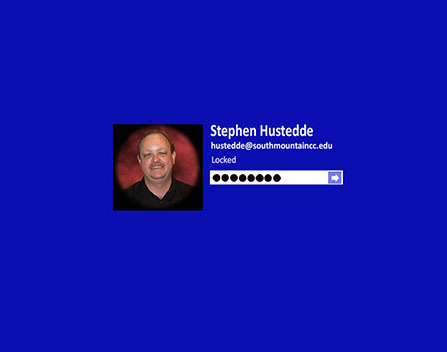
Figure 3 – The Windows 8 Login Screen
View "The Login Screen" video (1:09), which demonstrates the three ways to establish login procedures for Windows 8.
The Start Screen
Even if have not used Windows 8, you might have seen the new Start Screen in Microsoft's advertising. It is the face of Windows 8 and the control center of accessing the installed apps and getting to the familiar desktop mode. It is, in essence, the replacement of the Start Menu from previous versions of Windows. This is where you really begin to see the emphasis of design for touch screen friendliness.
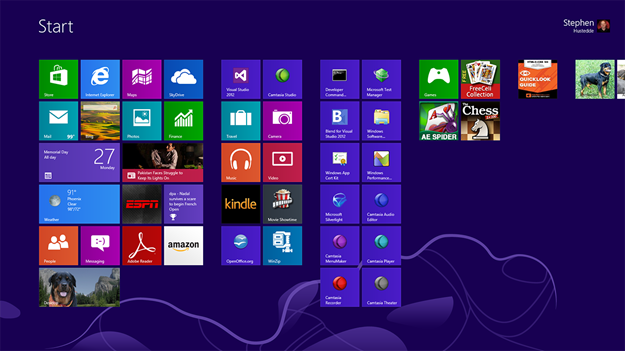
Figure 4 – The Windows 8 Start Screen
The Start Screen provides easy touch access to the installed apps via a layout of tiles. Each tile consists of a solid singular color with a simple icon and a descriptive name. Some tiles may have a dynamic or static image or provide live information. Tiles may be sized to be small (square) or large (rectangular) and grouped together with other tiles. The Start Screen can be scrolled horizontally to view more tiles by performing any of the following:
- TOUCH: Swipe right or left with your finger across the screen
- MOUSE: Touch the left or right edges of the screen with the mouse
- MOUSE: Move the mouse and a scroll bar appears at the bottom
- MOUSE: Use the mouse's scroll.
- KEYBOARD: Use PgUp or PgDn keys to move left or right one screen at a time.
Touch any tile, or click it with the mouse, to launch the represented app. To close an app, swipe or drag down from the top of the app to collapse it and then drag it to the bottom, as shown in the following video. From the keyboard you can also press Alt+F4, a shortcut from past versions of Windows.
With an app open, you can also return to the Start Screen by doing one of the following methods:
- TOUCH: Swipe inward from the right edge to open the Charms Bar. (You will learn more about this later).Tap the Start icon in the center of the Charms Bar.
- MOUSE: Point to the upper-left corner to access the Charms Bar. Click the Start icon in center of the Charms Bar.
- MOUSE: Point to the bottom-left corner of the display and click the Start thumbnail that appears there.
- KEYBOARD: Press the Windows key.
- KEYBOARD: Press the Ctrl + Esc.
View "The Start Screen" video (3:42), which discusses the use of the Start Screen.
The Charms Bar
The Charms Bar is one way to return to the Start Menu. The Charms Bar (named after a charms bracelet with its iconic attachments) is a new vertical panel providing access to key processes. It is available in all apps and screens. Specifically, it provides access to five general processes:
- Search – Perform context-sensitive searches. Look for files, search your email, or find an install app.
- Share – Send a selected file, picture, or text to email, Facebook, Twitter, or other social media outlet.
- Start – Toggle between the Start Screen and the most recently accessed open app.
- Devices – Access your printer, digital camera, external storage, and so on.
- Settings – Change context-sensitive settings, such as the Start Screen colors when the Start Screen is active.
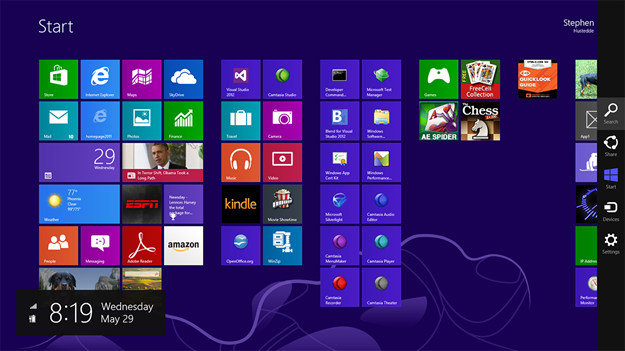
Figure 5 – The Charms Bar appears on the right of the display.
View "The Charms Bar" video (2:05), which demonstrates the access and use of the Charms Bar.
The App Bar
Another new panel in Windows 8 is the App Bar, which in essence replaces the traditional right-click menu. (After all, it is hard to right click a touch screen!) This panel appears at the top and/or bottom of the screen and is contextualized to provide options for the current app or screen. To access the App Bar, perform one of the following:
- TOUCH: Swipe downward from the top of the display.
- TOUCH: Swipe upward from the bottom of the display.
- MOUSE: Right-click on a blank area.
- KEYBOARD: Press Windows + Z.
- KEYBOARD: Press Shift + F10.
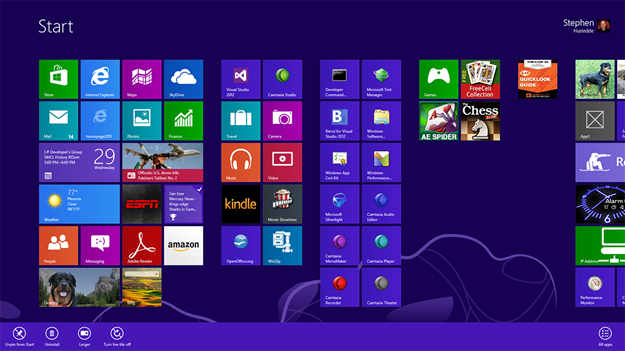
Figure 6 – The App Bar appears at the bottom for a selected tile in the Start Menu. Note the checkmark in the upper right of the Bing Sports tile (fourth column, fourth row).
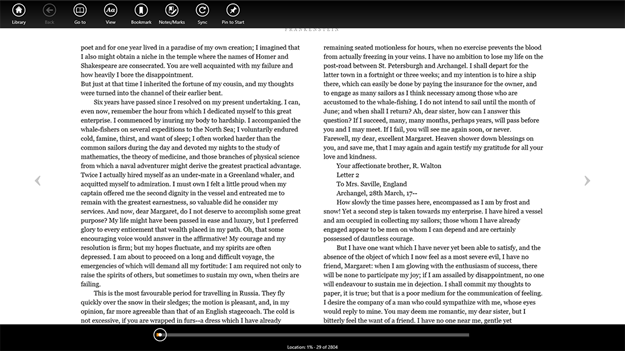
Figure 7 – The contextualized App Bar appears at the top, bottom, or both depending on the active app or screen. Here, the Kindle reader app utilizes both. (Screenshot used with permission from Microsoft)
The App Bar options for an individual tile on the Start Screen can be accessed by right-clicking the tile with the mouse or swiping downward on the tile with your finger on a touch screen. A checkmark appears in the upper right of the tile. You will see a demonstration later when looking at how to customize the Start Screen in resizing or removing (unpinning) tiles.
View "The App Bar" video (length: 2:00), which demonstrates how to access and use the App Bar with the Start Screen as well as with Windows 8 apps.
Navigating Between Open Apps
Unlike previous versions of Windows where multiple open applications placed limitations on RAM availability, Windows 8 caches any nonactive apps (including the desktop) as needed to preserve RAM. Technically, you can have as many apps open as you like, but only one (or two – see the "Snapping/Unsnapping" section) is active at any given time. This isolation of apps reduces resource use, extends the battery, and improves security. As part of this process, the traditional windows are gone for Windows 8 apps. Windows 8 apps always fill the screen.
You can toggle between the current active app and the most recently open (but inactive) app by using any of the following actions:
- TOUCH: Swipe in from the left.
- MOUSE: Point to the upper-left corner, then click the app thumbnail that appears.
- KEYBOARD: Press Windows + Tab.
You can access any of the recently opened apps using the following methods:
- TOUCH: Swipe in from the left and then back out to the right.
- MOUSE: Drag down from the upper left corner. Click an app in the list to make it the active app.
- KEYBOARD: Press Alt + Tab.
View "Switching Between Apps" video (length: 1:26), which demonstrates methods for switching between apps in Windows 8.
Snapping/Unsnapping
Snapping is the process of having two Windows 8 apps open simultaneously. One app occupies the majority of the screen either on the left or the right. Snapping facilitates sharing data between apps. In designing a Windows 8 app, you need to specify the design for each of the following states: filled, snapped, and full screen.
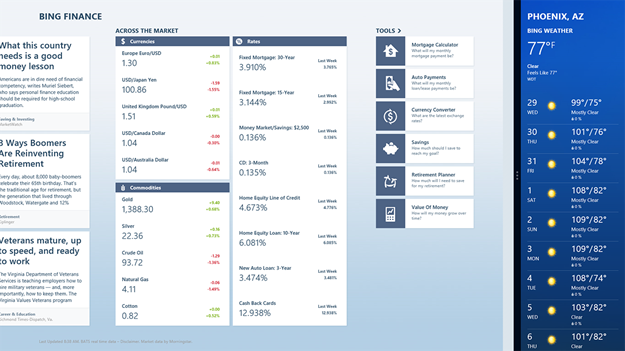
Figure 8 – Snapping allows two apps to share the screen.
To snap an inactive app:
- TOUCH: Swipe in from the left to about halfway across the screen and then back out to the right. This will split the screen. Choose the app to snap from the list of open apps.
- MOUSE: To snap the most recent app, point to the upper-left corner and drag the thumbnail to the left or right edge.
- MOUSE: Drag down from the upper-left corner to view the recent apps. Drag an app in the list to the left or right edge to snap it.
- KEYBOARD: Press Windows + Period to snap an app to the right.
- KEYBOARD: Press Windows + Shift + Period to snap an app to the left.
When using a snapped screen, you can drag the dividing bar from left to right or vice versa to switch which app has the majority display and which has the minority display. You also can do this with keyboard shortcut of Windows + J.
To unsnap an app, perform one of the following:
- TOUCH: Touch and drag the vertical divider bar to the left or right to unsnap the left or right app respectively.
- MOUSE: Drag the snap bar to the left edge to unsnap the left app or to the right edge to unsnap the right app.
- KEYBOARD: Press Windows + Period to unsnap the app on the right.
- KEYBOARD: Press Windows + Shift + Period to unsnap the app on the left.
View "Snapping and Unsnapping" video (2:16), which demonstrates the snapping/unsnapping feature of the Windows 8 user interface.
Toasts (Notifications)
Occasionally, pop-up notifications appear at the top-right corner of the display. These notifications are triggered by apps or by the operating system to alert the user of information that might be of interest to them. These notifications are often referred to as toasts (named after the pop-up feature of toasters) and are used in other operating systems, such as Android. As you start developing apps, there may be times when you will want to use toasts to notify the user. Now you know what to call them!
TIP: You can easily demonstrate timed toast notifications with the Relay app available in the Windows Store.
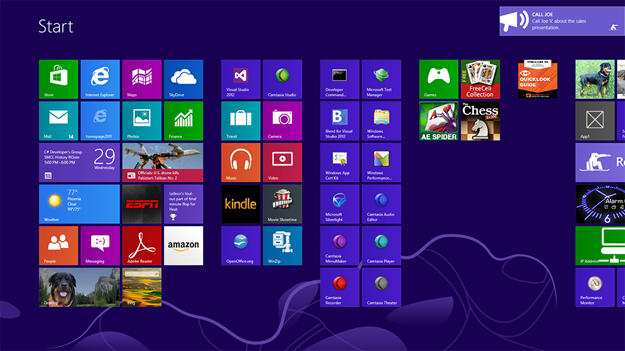
Figure 9 – Toast notifications appear in the upper-right corner of the display.
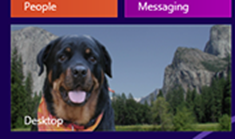
Figure 10 – Desktop tile that launches the Desktop mode from the Start Screen.
Familiar Territory: The Desktop Mode
Windows has been inaccurately referred to as two operating systems in one, given that older non-Windows 8 apps can be executed in the more-familiar Desktop mode (unless using Windows 8 RT). But some built-in applications in Windows 8 RT, such as the Office suite applications, run in the Desktop mode. The Desktop mode also may be used for other traditional tasks such as file management.
Accessing any Windows 7 type application shown as a tile on the Start Screen will launch the application in the Desktop mode. The Start Screen also contains a Desktop tile that launches the Desktop mode. From the keyboard, the Windows key toggles between the Start Screen and the Desktop mode.
More complicated programs, such as Visual Studio 2012, will run in the Desktop mode.
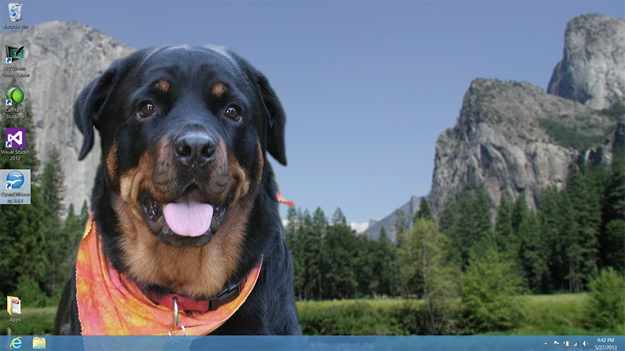
Figure 11 – The Desktop Mode has an almost identical look and feel to the old Windows 7 environment and provides access to older applications.
TIP: One thing missing from the traditional desktop is the Start menu in the bottom-left corner. As you have already seen, tapping or clicking the bottom-left corner toggles back to the Start Screen. There are rumors that Microsoft will capitulate to customer requests and include the old Start Menu in desktop mode in a future update. But there are currently third-party solutions for adding various styles of Start menus to the desktop.
View "The Desktop Mode" video (1:36), which discusses using the Desktop Mode to execute older software
Customizing Windows 8
Modifying the Lock Screen
The Lock Screen can be customized to change the background screen, alter the available apps, or switch the detailed status app.
Use the following steps to customize the lock screen:
- Access the Charms Bar, and tap or click the Settings charm.
- Tap or click on "Change PC Settings."
- Tap or click on "Personalize."
- To change the Background image:
- Select from the menu of images or Browse for any of your own images
- Click "Choose Picture"
- To change the available apps on the Lock Screen:
- Scroll down past the Background image choices
- Tap or click on an available app spot (showing a + icon)
- Select an app from the available list. The up-to-date information from this app will be available at the Lock Screen without first having to log in.
- The detailed status app automatically displays information on the Lock Screen with the date and time. To choose an app to display the detailed status on the Lock Screen:
- Scroll down past the available app choices
- Tap or click on the detailed status app icon
- Select an app from the list
- To remove an available app or to disable the detailed status app:
- Tap or click the icon of the app to be disabled
- Select the "Don't show quick status" option.
- Return to the Lock Screen by pressing Windows + L; or tap or click on the account picture in the upper right and choose "Lock" from the popup menu.
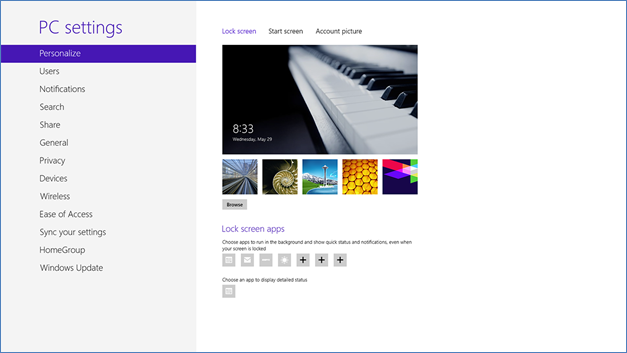
Figure 12 – The Lock Screen's background image may be changed and the lock screen badge apps specified to provide very basic info on the Lock Screen. One app may be chosen to provide greater detail.
View "Modifying the Lock Screen" video (1:31), which demonstrates modifying the Lock Screen settings.
Setting up Your Password
Three different types of passwords may be set. Initially, a traditional alpha-numeric password is created. Then a simpler 4-digt pin number password can be set. This is not as strong as the traditional password, but makes it simpler to access on a tablet or smartphone. The third type of password is to specify three gestures (lines, circles, etc.) on top of a chosen image. This method is truly geared to a touch device. All three passwords can be created and modified in the PC Settings, the Settings area of the Charms Bar, or the Account info in the upper-right corner (by choosing "Change account photo").
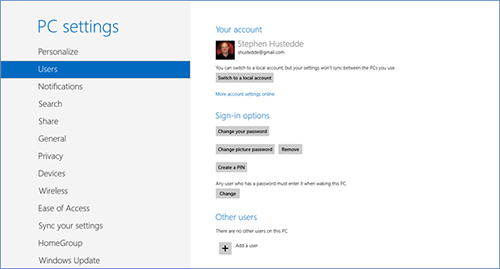
Figure 13 – The user's password can be modified in the PC Settings > users screen. You can set a regular password, a four digit PIN, or a picture password.
To set up a PIN password:
- Go to the PC Settings screen.
- Tap or click "Users" on the Left.
- Click or tap the "Create a Pin" button.
- You will need to enter your current traditional password.
- Enter a four digit number in both fields. Click or tap "Finish".
To set up a picture password, from the PC Settings screen:
- Go to the PC Settings screen
- Tap or click "Users" on the left.
- Click or tap the "Create a picture password" button.
- You will need to enter your current traditional password.
- Browse for an image of your choice and click or tap "Choose Picture".
- Back on the user's screen, tap or click "Use this picture".
- Draw three different gestures (lines, circle. or taps) on the image. Note the 1-2-3 numbers on the left showing the steps.
- You will be asked to repeat the three gestures a second time.
- Tap or click "Finish".
Modifying the Start Screen
The Start Screen is also customizable with both cosmetic and substantive changes.
To change the background design/color of the Start Screen:
- Access the Charms Bar, and tap or click the Settings charm.
- Tap or click on "Change PC Settings".
- Tap or click on "Personalize".
- Tap or click on "Start Screen".
- Choose a background and color choice.
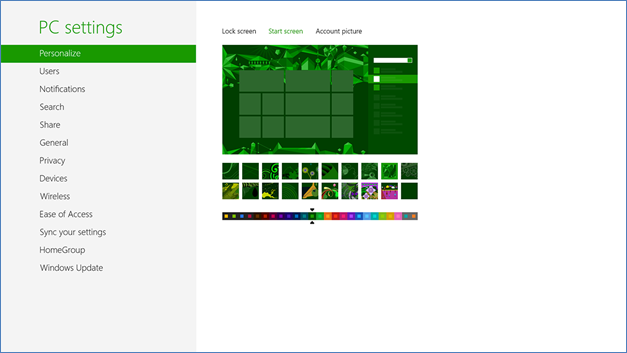
Figure 14 – The background pattern and color may be changed for the Start Screen in the PC Settings.
View "Changing the Start Screen Background" video (0:46), which demonstrates how to alter the Start Screen background.
The most substantive modification to the Start Screen is rearranging, resizing, and grouping tiles. Tiles for existing apps and programs may be added to the Start Screen for easy access, or they can be removed. Tiles may be dragged and dropped to a new location with the current tiles automatically shifting to make any necessary room for the new placement.
The Start Screen is also customizable with both cosmetic and substantive changes.
- Select the tile by swiping downward on it or right-clicking on it.
- From the App Bar at the bottom, tap or click on "Smaller" or "Larger".
- If the tile is a Live Tile, which means it features up-to-date refreshing of information, the Live feature can be turned on or off at the App Bar as well.
To remove (unpin) a tile from the Start Screen:
- Select the tile by swiping downward on it or right-clicking on it.
- Tap or click the Unpin icon on the bottom App Bar.
To uninstall an app:
- Select the tile by swiping downward on it or right-clicking on it.
- Tap or click the Uninstall icon on the bottom App Bar.
Figure 15 – Selecting an individual tile on the Start Screen allows for its appearance to be modified via the App Bar.
To add (pin) a tile to the Start Screen for an unpinned or an existing desktop application:
- Swipe up from the bottom, or down from the top, of the Start Screen to view the App Bar. Tap the "All Apps" icon on the App Bar. (With a mouse, right click on the Start Screen and choose "All Apps".)
- Locate the app or application in the list to be added to the Start Screen.
- Swipe downward on its icon (touch) or right-click the icon (mouse).
- Choose "Pin to Start" button on the App Bar.
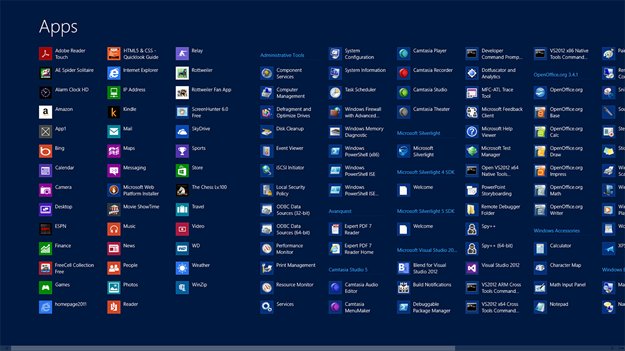
Figure 16 – The All Apps screen provides a list of all the Windows 8 apps on the left and other applications grouped by software on the right.
Tiles can be grouped together and new, named groups can be created. To create a new group:
- Move a tile to an open area until a gray bar appears. Release the tile to create a new group.
- Add more tiles to the group.
- Zoom out on the group with a two-finger pinch touch gesture or by clicking the Zoom option in the lower right of the display.
- Swipe down on the tile group (touch) or right-click on the tile group (mouse).
- Tap or click the "Name Group" option and provide a name for the group.
View "Customizing the Start Screen" video (2:02), which demonstrates how to rearrange, resize, add, remove, and group tiles on the Start Screen.
The Windows Store
Windows Store Overview
Microsoft adopted the successful model of the Apple App Store and the Google Play (Android) store in deciding that Windows 8 apps would be deployed via an online store – The Windows Store. In one stop, a user can explore various solutions matching their needs or wants, read customer reviews, and instantly download an app. Many of the apps are free. Those which are commercial can be purchased at the store with a credit card and installed immediately. The advantages are numerous and are as follows:
- No need for physically traveling to a store to purchase software
- No need for disk drives or CD/DVD drives to install
- No password input necessary for installation – users log into store with their Microsoft ID
- Safer downloading – reduced risk of security-threatening and virus-laden software
- Safer purchasing – reduced risk of credit card theft
- All apps meet Microsoft standards/certifications.
For the budding developer or the software corporation, there are significant advantages as well:
- No packaging or distribution costs for developers
- Updates to software automatically deployed after installation – no more patches
- Microsoft processes transaction fees and pays the developer royalties.
- Huge market access – All Windows 8 users can download/purchase your app.
- While we will explore app development with C# or VB.NET in this course to develop Windows Store apps, developers may also choose to use C++, or HTML5/CSS3/JavaScript to create deployable apps.
The Windows Store involves a few restrictions for the developer:
- To publish your app on the Windows Store, you will need a developer account. Individual and corporate accounts are available. Individual developer accounts are approximately $49/year.
- Your app must conform to Windows 8 standards – you will look at these as you progress through this course.
- Developers must choose and register a unique name for their app. An available name may be reserved for up to a year.
- TIP: Microsoft allows verified students to publish and sell apps on the Windows Store for free if their institution is participating in the DreamSpark program.
Accessing and Navigating the Windows Store
To access the Windows Store, tap or click the Store tile on the Start Screen. Because today's typical consumer uses multiple devices (desktop, laptop, phone, tablet), once you purchase or download an app, you may install it on up to five devices by accessing the Windows Store. This assumes that you are using the same Microsoft account on each device.
Upon entering the Windows Store, you will see tiles representing the top apps in various categories. Scroll left or right by swiping with your finger (touch screen) or dragging the scroll bar at the bottom with the mouse. The scroll wheel of a mouse may also be utilized or the PgUp or PgDn keys.
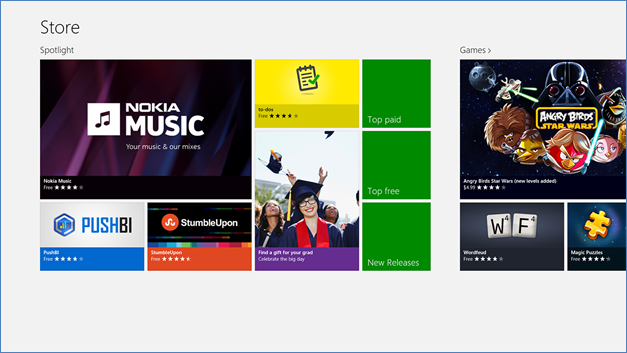
Figure 17 – The Windows Store is like a one-stop shopping mall for Windows 8 apps.
Categories include:
- Spotlight
- Games
- Social
- Entertainment
- Photos
- Music & video
- Books & reference
- News & weather
- Sports
- Food & dining
- Shopping
- Travel
- Productivity
- Tools
- Security
- Education
The various categories contain tiles for popular downloads and subcategories, such as the Top Paid, the Top Free apps, and New Releases. Tap or click a tile to navigate to the subcategory. This will show a listing of tiles for that category. Click or tap a tile to see details about the app, including screen shots, user ratings, and system requirements. You can scroll vertically within the app's details page by swiping or dragging the vertical scroll. The mouse scroll wheel or PgUp or PgDn keys also can be used to navigate.
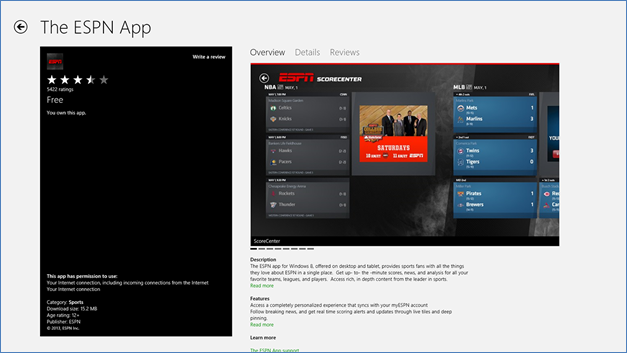
Figure 18 – Details of an app may be viewed in the Windows Store and include user reviews.
To return to the main page of the Windows Store, open the App Bar (swipe up from the bottom, down from the top or right click the mouse). Click or tap the "Home" button in the App Bar.
To search the store for a particular app, use the Search charm on the Charms Bar.
View "Browsing the Windows Store" video (3:42), which demonstrates how to explore the Windows Store to locate an app.
Installing an App
If a desired app that is free is located in the Store, click the "Install" button. If the app is a commercial app, click the "Buy" button. For many commercial apps, there also is a "Try" button where the app can be installed and tested for 7 days.
You may continue "shopping" the Store while an app is installing. Once installed, its tile will appear on the far right of the Start Screen. Drag the tile to wherever you would like it displayed on the Start Screen.
View the "Installing an App" video (1:23), which demonstrates how to install an app from the Windows Store.
Desktop applications can still be installed without going through the Store, including older versions of Windows applications on CD or DVD. Windows 8 apps are only deployed via the Windows Store. The exception to this is businesses with private apps. These Line of Business (LOB) apps may be installed directly using a process referred to as side-loading. Such apps must be specifically developed for side-loading and require issuing some commands in the Windows PowerShell to install. Microsoft maintains the Try It Out: Sideload Windows Store Apps article on how to sideload an app. As a developer you will be able to install your app on a mobile device by installing and using the Remote Debugger Tools.
Practice
- Explain the difference between Windows 8 RT and Windows 8 to a classmate.
- Explain the differences between Windows 8 Modern Style apps and traditional desktop applications to a classmate.
- Demonstrate the following actions for a classmate:
- Modify the Lock screen's picture and available apps.
- Rearrange tiles on the Start Screen.
- Change a Start Screen's tile from large to small and from small to large.
- Create a new group on the Start Screen and give it a name.
- Change the Start Screen's background pattern and color.
- Access the Desktop mode and then return to the Start Screen.
- Launch a Windows 8 app. Return to the Start Screen. Launch another Windows 8 App. Snap the first app to the right. Change the Snap display to switch the dominant app. Unsnap the second app. Return to the Start Screen.
- Explore the Windows Store and view the top free productivity apps. Search for a chess game.
Assignments
Complete the following:
- Quiz Lesson 1
- Assignment 1A: Compare hardware ads for Windows 8 devices
- Assignment 1B: Create a handout on Windows 8 Modern Apps vs. Traditional Desktop applications
- Assignment 1C: Customize the Lock Screen and Start Menu
- Assignment 1D: Install an app from the Windows Store
Summary
The Windows 8 boot process flows from an initial Lock Screen to the Login Screen to the Start Screen. The Lock Screen provides access to popular, live information without having to first log in. The Login Screen provides password access restrictions to the device. The Start Screen is the control center for accessing the Windows 8 apps. All three of these screens are customizable.
Windows 8 apps differ from traditional (Windows 7 style) applications. Apps occupy the entire screen, utilize specific Windows standards and behaviors, and are installed via the Windows Store. One such standard behavior is the ability to snap a second app side-by-side to the current app. Windows desktop applications execute in the Desktop Mode of Windows 8, reminiscent of the Windows 7 environment. All apps and screens have access to the Charms Bar, a vertical popup panel that provides contextualized search capabilities, access to devices, and modifications of settings. They also have access to the App Bar, a horizontal panel at the top or the bottom of the screen to provide options specific to the app or screen.
The Windows Store provides a one-stop access point for all public Windows 8 apps. Whether free or commercial, they can be immediately installed onto a device via the Internet. This represents a huge market for C# and VB.NET developers due to ease of deployment, marketing, and monetization.

This work is created by the National Information Security and Geospatial Technologies Consortium (NISGTC), and except where otherwise noted, is licensed under the Creative Commons Attribution 3.0 Unported License