Introduction
Most programs utilize data that is stored in external formats. This lesson examines reading data from an external document located in the app folder itself or in a user's folders accessible to a Windows app, such as the user's document's folder or the Photos or Music folder. A windows Store app is restricted from accessing data just anywhere on the hard drive, and access to the user's folders must be declared via the manifest. The user will be notified that the app will access these specific folders. For example, an app to display the images located in the user's My Pictures folder must be given permission to do so.
In addition to local files, an app may read and write data to the user's account folder so that all devices may sync with the data. These are referred to as roaming data files. For example, users likely want a calendar app to access up-to-date information whether using their desktop, laptop, or tablet device.
Data also can be read from an Internet server. Windows Azure is the ideal way to accomplish this, but that is beyond the scope of this course. In this lesson, you will simply access a read-only data file from a website to view static information.
XML (Extensible Markup Language) has long been a standard for defining data in a text-only, human readable format. But a new format called JSON is emerging. JSON stands for JavaScript Object Notation and is very simple to use within Windows 8 apps. You will read and write data to a JSON local file as well as to a roaming file.
- Identify the locations (paths) where a Windows 8 app may access data.
- Establish permission to access specific data types in a specific location via the Package.appxmanifest.
- Create a program that reads and writes data to an external file.
- Utilize data binding of controls to display record information.
- Overview of Data Access for Windows 8
- Reading and Writing Data to the App's Folder
- Reading and Writing Data to the User's Library Folders
- Reading and Writing Data to the User's Roaming Account
- Accessing Images in the User's Pictures Library
- Using JSON Formatted Data
- Writing Data to a JSON Formatted File
- None
- Quiz 7
- Assignment 7A (To Do List)
Instruction
(Note: Due to the formatting limitations of this document, some code snippets presented here may include statements split on more than one line when in the code editor they should not be. E.g. literal strings (red text enclosed in quotes) must occur on one line. Make the appropriate corrections in the Visual Studio text editor.)
In the previous lesson, you looked at storing application settings and data in progress to provide a more seamless user experience if an app is suspended. In this lesson, you will focus on apps that are supported by an external data source, whether located locally on the user's device, remotely in an account shared by all devices (roaming), in the cloud, or on an external public server. You will bind controls to data in a List that can be populated from an external source. JSON-formatted data is becoming increasing popular and works very nicely with Windows 8 apps.
There are other formats that work well with Windows 8, such as XML and SQLite. SQLite requires the inclusion of an additional SDK into Visual Studio. Since most instructors probably do not have administrative privileges to install it, I have forgone discussing SQLite in this lesson. No doubt you will find many good resources online that address using XML or SQLite with Windows 8 apps.
Overview of Data Access for Windows 8
A Windows 8 Store App may read and write data to several different locations, but cannot necessarily access just any folder or path on the device's drives. Options include:
- App local storage – Up to 100 KB may be stored with the app in its installation folder. No permission is needed from a user to access this data, but the data cannot be shared with other apps.
- User's known folders (local) – An app may access the user's Documents folder or their Pictures, Music, and Video folders. The intent to access any of these folders must be established in the Package.appxmanifest document. The user must grant permission to allow this access when the app is installed. Of course, these documents may be shared with other apps.
- User's known folders (roaming) – The same user's folder structures are also maintained remotely for the user. These are accessible between multiple devices so that the same experience is encountered across each device. By reading the data upon startup and intermittently, the devices can appear to be synced. Disadvantages are that Internet access is required, the read/write process is slower, and the data is limited to 100KB.
- Cloud (accessing a public server) – Data can be read from a text file, a JSON-formatted file, or an XML-formatted file on a public server, just like loading a website. Read/Write access to a database (such as MySQL or Microsoft SQL) can be handled by passing data to and from a PHP or ASP.NET program or by utilizing a web service that pushes data to an app. Accessing a read-only data file on a server will be demonstrated in this lesson.
- Cloud (Windows Azure) – Microsoft's Windows Azure is a cloud-based platform for distributing and managing apps in the cloud. Data for these apps can be stored in the cloud as well and is available to multiple devices. This is a more robust strategy than the aforementioned roaming option, but further discussion falls outside the realm of this course.
Reading and Writing Data to the App's Folder
You can set up a simple demonstration of reading and writing data to the app's folder.
Step 1: Create a new app (Blank Template). Add two textbox controls for the user to enter a first name and last name into, along with two buttons with their Content properties set to "Save" and "Retrieve" respectively.
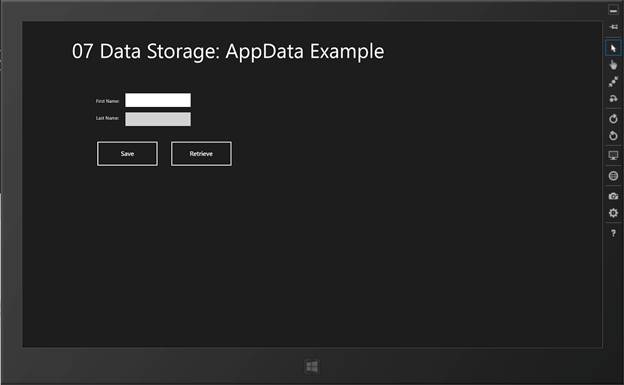
Figure 1 – A very simple interface to demonstrate data persistence. The user enters a first and last name and clicks the Save button. The information is written to the app's folder and can be retreived at a subsequent execution of the app.
XAML Code for Mainpage.xaml
<Page
x:Class="_07_Data___app_folder.MainPage"
xmlns="http://schemas.microsoft.com/winfx/2006/xaml/presentation"
xmlns:x="http://schemas.microsoft.com/winfx/2006/xaml"
xmlns:local="_07_Data___app_folder"
xmlns:d="http://schemas.microsoft.com/expression/blend/2008"
xmlns:mc="http://schemas.openxmlformats.org/markup-compatibility/2006"
mc:Ignorable="d">
<Grid Background="{StaticResource ApplicationPageBackgroundThemeBrush}">
<TextBlock HorizontalAlignment="Left" Margin="118,44,0,0" TextWrapping="Wrap"
Text="07 Data Storage: AppData Example" VerticalAlignment="Top"
FontSize="48"/>
<TextBlock HorizontalAlignment="Left" Height="10" Margin="175,183,0,0"
TextWrapping="Wrap" Text="First Name:" VerticalAlignment="Top" Width="64"/>
<TextBox x:Name="txtFN" HorizontalAlignment="Left" Height="26"
Margin="244,171,0,0" TextWrapping="Wrap" Text="" VerticalAlignment="Top"
Width="154"/>
<TextBlock HorizontalAlignment="Left" Height="10" Margin="175,223,0,0"
TextWrapping="Wrap" Text="Last Name:" VerticalAlignment="Top" Width="64"/>
<TextBox x:Name="txtLN" HorizontalAlignment="Left" Height="26"
Margin="244,216,0,0" TextWrapping="Wrap" Text="" VerticalAlignment="Top"
Width="154"/>
<Button x:Name="btnSave" Content="Save" HorizontalAlignment="Left" Height="62"
Margin="175,282,0,0" VerticalAlignment="Top" Width="148" Click="SaveData"/>
<Button x:Name="btnRetrieve" Content="Retrieve" HorizontalAlignment="Left"
Height="62" Margin="350,282,0,0" VerticalAlignment="Top" Width="148"
Click="RetrieveData"/>
</Grid>
</Page>
Step 2: Write the code in the C# or VB code behind. In the code behind (Mainpage.xaml.cs or Mainpage.xaml.vb), a using directive for Windows.Storage was included. This provides the ability to specify an ApplicationDataContainer class-level variable (myAppData) that is set to the ApplicationData.Current.LocalSettings. Likewise, a StorageFolder variable (myAppFolder) is created, and its value is initialized as ApplicationData.Current.LocalFolder. A dataFileName variable of type string was created and its value was set to the name of our data file "myData.txt".
When the page is loaded (the OnNavigatedTo handler), a method of SetDataFile is called. This method creates the data file if it does not exist in the myAppFolder by calling the CreateFileAsync( ) method of the Windows.Storage class. This method is called as an asynchronous thread using the "await" keyword, which also requires that you place the "async" keyword in the method declaration. This allows the subsequent code to be executed while the asynchronous thread is being completed, speeding up the overall processing.
The user enters the first and last names into the appropriate textboxes. Upon clicking the Save button, the SaveData method is called. This method writes to key-value pairs to be written to the app's data file. Specifically, the keys are FirstName and LastName, and their values are Text properties of the two textboxes.
The storage can be tested by deleting the text from these two textboxes, and then clicking the Retrieve button. This button calls the RetrieveData method. It simply gets the values from the data file using the key names and assigns them to the Text property of the textboxes. This works if the app is closed and subsequently executed again.
C# code (Mainpage.xaml.cs)
using System;
using System.Collections.Generic;
using System.IO;
using System.Linq;
using Windows.Foundation;
using Windows.Foundation.Collections;
using Windows.UI.Xaml;
using Windows.UI.Xaml.Controls;
using Windows.UI.Xaml.Controls.Primitives;
using Windows.UI.Xaml.Data;
using Windows.UI.Xaml.Input;
using Windows.UI.Xaml.Media;
using Windows.UI.Xaml.Navigation;
using Windows.Storage;
namespace _07_Data___app_folder
{
public sealed partial class MainPage : Page
{
ApplicationDataContainer myAppData = ApplicationData.Current.LocalSettings;
StorageFolder myAppFolder = ApplicationData.Current.LocalFolder;
string dataFileName = "myData.txt";
public MainPage()
{
this.InitializeComponent();
}
protected override void OnNavigatedTo(NavigationEventArgs e)
{
SetDataFile();
}
private void SaveData(object sender, RoutedEventArgs e)
{
string fn = txtFN.Text;
string ln = txtLN.Text;
myAppData.Values["FirstName"] = fn;
myAppData.Values["LastName"] = ln;
txtFN.Text = "";
txtLN.Text = "";
}
private void RetrieveData(object sender, RoutedEventArgs e)
{
txtFN.Text = myAppData.Values["FirstName"].ToString();
txtLN.Text = myAppData.Values["LastName"].ToString();
}
private async void SetDataFile()
{
try
{
//create the data file if it doesn't exist
await myAppFolder.CreateFileAsync(dataFileName);
}
catch
{
}
}
}
}
VB Code (Mainpage.xaml.vb)
Imports Windows.Storage
Public NotInheritable Class MainPage
Inherits Page
Dim myAppData As ApplicationDataContainer = ApplicationData.Current.LocalSettings
Dim myAppFolder As StorageFolder = ApplicationData.Current.LocalFolder
Dim dataFileName As String = "myData.txt"
Protected Overrides Sub OnNavigatedTo(e As Navigation.NavigationEventArgs)
SetDataFile()
End Sub
Private Async Sub SetDataFile()
Try
'create the data file if it doesn't exist
Await myAppFolder.CreateFileAsync(dataFileName)
Catch ex As Exception
End Try
End Sub
Private Sub SaveData(sender As Object, e As RoutedEventArgs) Handles btnSave.Click
Dim fn As String = txtFN.Text
Dim ln As String = txtLN.Text
myAppData.Values("FirstName") = fn
myAppData.Values("LastName") = ln
txtFN.Text = ""
txtLN.Text = ""
End Sub
Private Sub RetrieveData(sender As Object, e As RoutedEventArgs) Handles
btnRetrieve.Click
txtFN.Text = myAppData.Values("FirstName").ToString()
txtLN.Text = myAppData.Values("LastName").ToString()
End Sub
End Class
Step 3: You can take it a step further and save multiple records for first and last names. You can simply add more controls to the form to display the records. You will still use the txtFN and txtLN textboxes for the user to enter names, but now you will save them out to a data file with multiple lines.
Modify the XAML code to include a listbox and three new buttons. The previous Save and Retrieve buttons were commented out in the XAML code.
XAML Code (Mainpage.xaml)
<Page
x:Class="_07_Data_B___multiple_records__CS_.MainPage"
xmlns="http://schemas.microsoft.com/winfx/2006/xaml/presentation"
xmlns:x="http://schemas.microsoft.com/winfx/2006/xaml"
xmlns:local="using:_07_Data_B___multiple_records__CS_"
xmlns:d="http://schemas.microsoft.com/expression/blend/2008"
xmlns:mc="http://schemas.openxmlformats.org/markup-compatibility/2006"
mc:Ignorable="d">
<Grid Background="{StaticResource ApplicationPageBackgroundThemeBrush}">
<<TextBlock HorizontalAlignment="Left" Margin="118,44,0,0" TextWrapping="Wrap"
Text="07 Data Storage: AppData Example" VerticalAlignment="Top"
FontSize="48"/>
<TextBlock HorizontalAlignment="Left" Height="10" Margin="175,183,0,0"
TextWrapping="Wrap" Text="First Name:" VerticalAlignment="Top" Width="64"/>
<TextBox x:Name="txtFN" HorizontalAlignment="Left" Height="26"
Margin="244,171,0,0" TextWrapping="Wrap" Text="" VerticalAlignment="Top"
Width="154"/>
<TextBlock HorizontalAlignment="Left" Height="10" Margin="175,223,0,0"
TextWrapping="Wrap" Text="Last Name:" VerticalAlignment="Top" Width="64"/>
<TextBox x:Name="txtLN" HorizontalAlignment="Left" Height="26"
Margin="244,216,0,0" TextWrapping="Wrap" Text="" VerticalAlignment="Top"
Width="154"/>
<!--<Button x:Name="btnSave" Content="Save" HorizontalAlignment="Left"
Height="62"
Margin="175,282,0,0" VerticalAlignment="Top" Width="148" Click="SaveData"/>
<Button x:Name="btnRetrieve" Content="Retrieve" HorizontalAlignment="Left"
Height="62" Margin="350,282,0,0" VerticalAlignment="Top" Width="148"
Click="RetrieveData"/> -->
<ListBox x:Name="lbxPersons" HorizontalAlignment="Left" Height="261"
Margin="667,171,0,0" VerticalAlignment="Top" Width="301" FontSize="18"/>
<Button x:Name="btnSaveRecord" Content="Save Record" HorizontalAlignment="Left"
Height="62" Margin="667,446,0,0" VerticalAlignment="Top" Width="148"
Click="SaveRecord"/>
<Button x:Name="btnShowDirectory" Content="Show Records"
HorizontalAlignment="Left" Height="62" Margin="820,446,0,0"
VerticalAlignment="Top" Width="148" Click="ShowData"/>
<Button x:Name="btnDeleteRecord" Content="Delete Selected"
HorizontalAlignment="Left" Height="62" Margin="973,446,0,0"
VerticalAlignment="Top" Width="148" Click="DeleteRecord"/>
</Grid>
</Page>
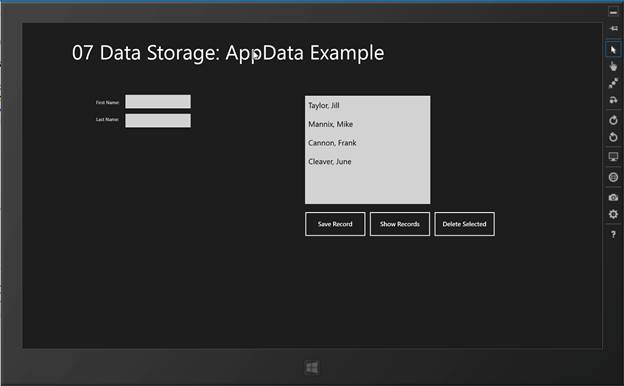
Figure 2 – The modified program to save and display multiple records.
Step 4: In the code behind (Mainpage.xaml.cs and Mainpage.xaml.vb), the dataFileName is changed to "persons.txt". This is still a simple, plain text file. Data will be stored as tab-delimited text. A structure was created named Person containing and integer value for a record number and two string values for first and last names. A List was created of type Persons. The list will contain the data records that will be read from and written to the data file.
The Save Record button's click event is handled by the SaveRecord method. It verifies that the first and last name fields are not empty, then it creates a string of the last name and first name values separated by a tab character. A stream object is created to connect the app with the data file and a StreamWriter object is then initiated. The new record is appended to the existing file, and the textboxes are cleared awaiting the next new record. A call to DisplayAll was later added to display the new record in the listbox. The DisplayAll method was created as part of the Show Records button handling, discussed next.
The event procedure for the Show Records button's click event simply calls a method named DisplayAll so the listbox display could be refreshed by all three buttons, including adding and deleting a record. The DisplayAll method reopens the stream between the app and the data file and establishes a StreamReader object. Both the listbox display and the underlying recs List are cleared. The data file is read one line at a time, with each line read and the comma-delimited items split into an array. The array values are used to populate a new Person object in the recs List, and the record is displayed in the listbox as well. The reading of the data occurs in a repetition structure until all lines have been read and the List and listbox populate.
The Delete Record button handles the click event with the DeleteRecord method. This method verifies that the user has selected an item in the listbox. It retrieves the index number of the item and uses this to delete the appropriate item in the recs List. It then writes the modified List back out to the data file using a StreamWriter object and calls the DisplayAll methods to revise the listbox display.
C# Code Modified (Mainpage.xaml.cs)
using System;
using System.Collections.Generic;
using System.IO;
using System.Linq;
using Windows.Foundation;
using Windows.Foundation.Collections;
using Windows.UI.Xaml;
using Windows.UI.Xaml.Controls;
using Windows.UI.Xaml.Controls.Primitives;
using Windows.UI.Xaml.Data;
using Windows.UI.Xaml.Input;
using Windows.UI.Xaml.Media;
using Windows.UI.Xaml.Navigation;
using Windows.Storage;
namespace _07_Data_B___multiple_records__CS_
{
public sealed partial class MainPage : Page
{
ApplicationDataContainer myAppData = ApplicationData.Current.LocalSettings;
StorageFolder myAppFolder = ApplicationData.Current.LocalFolder;
string dataFileName = "persons.txt"; //Changed
struct Person //Added Structure
{
public int id;
public string firstName;
public string lastName;
}
IList<Person> recs = new List<Person>(); //Added List of type persons
public MainPage()
{
this.InitializeComponent();
}
protected override void OnNavigatedTo(NavigationEventArgs e)
{
SetDataFile();
}
private void SaveData(object sender, RoutedEventArgs e)
{
string fn = txtFN.Text;
string ln = txtLN.Text;
myAppData.Values["FirstName"] = fn;
myAppData.Values["LastName"] = ln;
txtFN.Text = "";
txtLN.Text = "";
}
private void RetrieveData(object sender, RoutedEventArgs e)
{
txtFN.Text = myAppData.Values["FirstName"].ToString();
txtLN.Text = myAppData.Values["LastName"].ToString();
}
private async void SetDataFile()
{
try
{
//create the data file if it doesn't exist
await myAppFolder.CreateFileAsync(dataFileName);
}
catch
{
}
}
private async void SaveRecord(object sender, RoutedEventArgs e)
{
if (txtLN.Text != null && txtFN.Text != null)
{
string myRecord = txtLN.Text + "\t" + txtFN.Text;
System.IO.Stream myStream = await
myAppFolder.OpenStreamForWriteAsync(dataFileName,
CreationCollisionOption.OpenIfExists);
StreamWriter sw = new StreamWriter(myStream);
await sw.WriteLineAsync(myRecord);
sw.Dispose();
txtFN.Text = "";
txtLN.Text = "";
DisplayAll();
}
}
private void ShowData(object sender, RoutedEventArgs e)
{
DisplayAll();
}
private async void DisplayAll()
{
lbxPersons.Items.Clear();
StorageFile myData = await myAppFolder.GetFileAsync(dataFileName);
StreamReader sr = new StreamReader(await myData.OpenStreamForReadAsync());
string[] xyz = new string[2];
recs.Clear();
Person newPerson;
int abc = 0;
while (!sr.EndOfStream)
{
string currentRecord = sr.ReadLine();s
try
{
xyz = currentRecord.Split('\t');
newPerson.lastName = xyz[0];
newPerson.firstName = xyz[1];
newPerson.id = abc;
recs.Add(newPerson);
lbxPersons.Items.Add(recs[abc].lastName + ", " +
recs[abc].firstName);
abc++;
}
catch
{
}
}
sr.Dispose();
}
private async void DeleteRecord(object sender, RoutedEventArgs e)
{
if (lbxPersons.SelectedIndex > -1)
{
recs.RemoveAt(lbxPersons.SelectedIndex);
//overwrite the file
System.IO.Stream myStream = await
myAppFolder.OpenStreamForWriteAsync(dataFileName,
CreationCollisionOption.ReplaceExisting);
StreamWriter sw = new StreamWriter(myStream);
int i = 0;
for (i = 0; i < recs.Count; i++)
{
await sw.WriteLineAsync(recs[i].lastName + "\t" + recs[i].firstName);
}
sw.Dispose();
DisplayAll();
}
}
}
}
VB Code Modified (Mainpage.xaml.vb)
Imports Windows.Storage
Public NotInheritable Class MainPage
Inherits Page
Dim myAppData As ApplicationDataContainer = ApplicationData.Current.LocalSettings
Dim myAppFolder As StorageFolder = ApplicationData.Current.LocalFolder
Dim dataFileName As String = "persons.txt" ' Changed
Structure Person ' Added Structure
Dim id As Integer
Dim firstName As String
Dim lastName As String
End Structure
Dim recs As IList(Of Person) = New List(Of Person) ' Added List of type persons
Protected Overrides Sub OnNavigatedTo(e As Navigation.NavigationEventArgs)
SetDataFile()
End Sub
Private Async Sub SetDataFile()
Try
'create the data file if it doesn't exist
Await myAppFolder.CreateFileAsync(dataFileName)
Catch ex As Exception
End Try
End Sub
Private Async Sub SaveRecord(sender As Object, e As RoutedEventArgs) Handles
btnSaveRecord.Click
If (txtLN.Text <> "" And txtFN.Text <> "") Then
Dim myRecord As String = txtLN.Text + ChrW(9) + txtFN.Text
Dim myStream As System.IO.Stream = Await _
myAppFolder.OpenStreamForWriteAsync(dataFileName, _
CreationCollisionOption.OpenIfExists)
Dim sw As StreamWriter = New StreamWriter(myStream)
Await sw.WriteLineAsync(myRecord)
sw.Dispose()
txtFN.Text = ""
txtLN.Text = ""
DisplayAll()
End If
End Sub
Private Sub ShowData(sender As Object, e As RoutedEventArgs) Handles
btnShowDirectory.Click
DisplayAll()
End Sub
Private Async Sub DisplayAll()
lbxPersons.Items.Clear()
Dim myData As StorageFile = Await myAppFolder.GetFileAsync(dataFileName)
Dim sr As StreamReader = New StreamReader(Await myData.OpenStreamForReadAsync())
Dim xyz(2) As String
recs.Clear()
Dim newPerson As Person
Dim abc As Integer = 0
Dim currentRecord As String
Do While (sr.Peek <> -1)
currentRecord = sr.ReadLine()
Try
xyz = currentRecord.Split(ChrW(9))
newPerson.lastName = xyz(0)
newPerson.firstName = xyz(1)
newPerson.id = abc
recs.Add(newPerson)
lbxPersons.Items.Add(recs(abc).lastName & ", " & _
recs(abc).firstName)
abc += 1
Catch ex As Exception
End Try
Loop
sr.Dispose()
End Sub
Private Async Sub DeleteRecord(sender As Object, e As RoutedEventArgs) Handles
btnDeleteRecord.Click
If (lbxPersons.SelectedIndex > -1) Then
recs.RemoveAt(lbxPersons.SelectedIndex)
' overwrite the file
Dim myStream As System.IO.Stream = Await _
myAppFolder.OpenStreamForWriteAsync(dataFileName, _
CreationCollisionOption.ReplaceExisting)
Dim sw As StreamWriter = New StreamWriter(myStream)
Dim i As Integer
For i = 0 To recs.Count - 1
Await sw.WriteLineAsync(recs(i).lastName & ChrW(9) & recs(i).firstName)
Next
sw.Dispose()
DisplayAll()
End If
End Sub
End Class
Reading and Writing Data to the User's Library Folders
Step 5: Instead of writing the data to the app's local folder, you can have it read and write to a text file in the user's Document's Library. You just need to make a slight change in the code. Comment out the creation of the myAppFolder being set to the ApplicationData.Current,LocalFolder and replace it with a similar line of code that sets myAppFolder to KnownFolders.Documents.Library.
C# Code Modified (Mainpage.xaml.cs)
. . . .
namespace _07_Data_B___multiple_records__CS_
{
public sealed partial class MainPage : Page
{
ApplicationDataContainer myAppData = ApplicationData.Current.LocalSettings;
// Option 1: Read and write data to the app's local folder
// StorageFolder myAppFolder = ApplicationData.Current.LocalFolder;
// Option 2: Read and write data to the user's Documents Library
StorageFolder myAppFolder = KnownFolders.DocumentsLibrary;
string dataFileName = "persons.txt"; //Changed
struct Person //Added Structure
{
public int id;
public string firstName;
public string lastName;
}
IList<Person> recs = new List<Person>(); //Added List of type persons
public MainPage()
. . . .
VB Code Modified (Mainpage.xaml.vb)
Imports Windows.Storage
Public NotInheritable Class MainPage
Inherits Page
Dim myAppData As ApplicationDataContainer = ApplicationData.Current.LocalSettings
' Option 1: Read and write to local app fodler
' Dim myAppFolder As StorageFolder = ApplicationData.Current.LocalFolder
' Option 2: Read and write data to the User's Dcouments folder
Dim myAppFolder As StorageFolder = KnownFolders.DocumentsLibrary
Dim dataFileName As String = "persons.txt" ' Changed
Structure Person ' Added Structure
Dim id As Integer
Dim firstName As String
Dim lastName As String
End Structure
Dim recs As IList(Of Person) = New List(Of Person) ' Added List of type persons
. . . .
Step 6: Test the application in the simulator. We get an error:
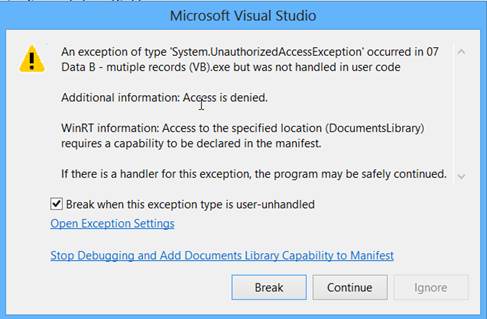
Figure 3 – The "Access is denied" error message
The error message occurs because the app has been denied access to the Documents library. To overcome this, the intent to access the Documents library must be declared in the app's manifest. In doing so, the user must grant permission to the app to access the Document library during the installation process.
Open the Package.appxmanifest document from the Project's solution explorer. Click the "Capabilities" tab and place a checkmark before the Documents Library listing.
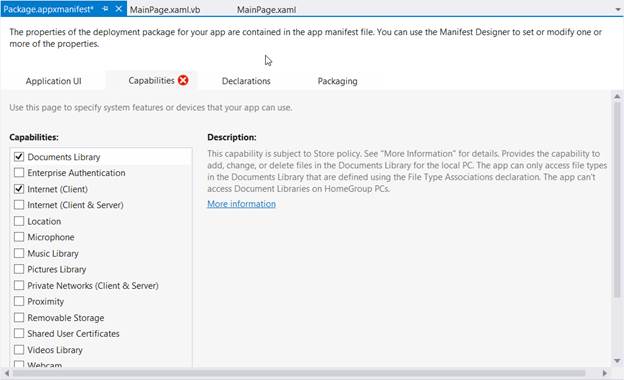
Figure 4 – The Capabilities tab of the Package.appxmanifest allows the developer to specify device features and libraries that the app will need to access.
A red error X will appear on the Capabilities tab. This will go away once the types of files that the app should be able to access in the Documents Library are declared. Click the Declarations tab.
Choose "File Type Associations" from the Available Declarations drop down list, and click the "Add" button to its right. In the resulting form, enter the following values:
- Display Name: Text Files
- Name: txt
- Open is Safe checkbox: Place a checkmark
- File type: .txt
Now the project can be ran and the data will be read to and written from a text file named "persons.txt" located in the user's Documents library.
Documents Library listing.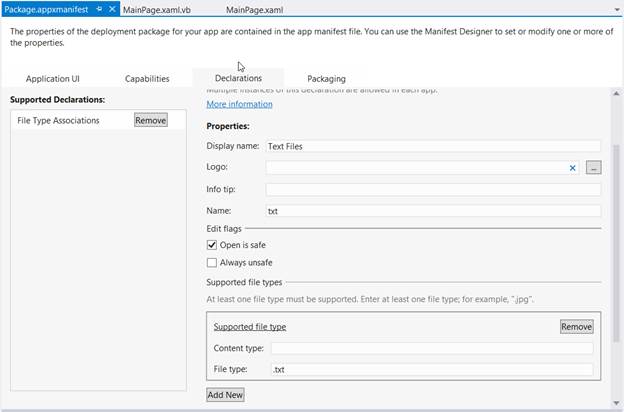
Figure 5 – The file type(s) for the app to access must be declared in the Declarations tab of the Package.appxmanifest.
Reading and Writing Data to the User's Roaming Account
If the data is to be shared amongst devices that the user uses (such as a desktop, a laptop, and a tablet), the data may be written to the user's roaming storage. This requires that the user log into each device with the same account information. Data is limited to 100 KB and the data cannot be accessed by other users. It may be accessed by other apps on the user's device. The difference between reading and writing to the user's local libraries and the user's roaming library is very minimal. In fact, it involves changing just two lines of code in your previous project. The highlighted code contrasts the old statements (now commented) and its replacement.
C# Code Modified (Mainpage.xaml.cs)
. . . .
namespace _07_Data_B___mutiple_records__CS_
{
public sealed partial class MainPage : Page
{
//ApplicationDataContainer myAppData = ApplicationData.Current.LocalSettings;
ApplicationDataContainer myAppData = ApplicationData.Current.RoamingSettings;
// Option 1: Read and write data to the app's local folder
// StorageFolder myAppFolder = ApplicationData.Current.LocalFolder;
// Option 2: Read and write data to the user's Documents Library
// StorageFolder myAppFolder = KnownFolders.DocumentsLibrary;
StorageFolder myAppFolder = ApplicationData.Current.RoamingFolder;
. . . .
VB Code Modified (Mainpage.xaml.vb)
Imports Windows.Storage
Public NotInheritable Class MainPage
Inherits Page
' Dim myAppData As ApplicationDataContainer = ApplicationData.Current.LocalSettings
Dim myAppData As ApplicationDataContainer = ApplicationData.Current.RoamingSettings
' Option 1: Read and write to local app fodler
' Dim myAppFolder As StorageFolder = ApplicationData.Current.LocalFolder
' Option 2: Read and write data to the User's Dcouments folder
' Dim myAppFolder As StorageFolder = KnownFolders.DocumentsLibrary
Dim myAppFolder As StorageFolder = ApplicationData.Current.RoamingFolder
Dim dataFileName As String = "persons.txt" ' Changed
. . . .
Once you have changed the code, you are done making changes! In each case, you changed the ApplicationDataContainer to reflect the RoamingSettings rather than the LocalSettings. For both, you also set the StorageFolder from Known.DocumentsLibrary to ApplicationData.Current.RoamingFolder. And of course, the device needs to be connected to the Internet.
Accessing Images in the User's Pictures Library
In the same manner, you can create an app that accesses the images stored in the users Pictures library. In the following project, you will create a viewer that displays thumbnails of the JPG and PNG documents in the user's Pictures library. The thumbnails will be shown in a single column GridView within a ScrollViewer. The user can click on a thumbnail to see a larger view of the image.

Figure 6 – The Image Viewer accesses the user's Photo library.
Review "Accessing Images in the User's Pictures Library" section in the Lesson 7 Guide for detailed information and examples.
Using JSON Formatted Data
JSON (JavaScript Object Notation), like XML (Extensible Markup Language) is a text-based open standard for data interchange. It is human-readable and language independent, utilizing key/value pairs. Like XML, its origin was in transmitting data between a web application and a server, but is also useful as a backend data source for both local and cloud apps. JSON data is transmitted as a string which is serialized and de-serialized by a program. JSON is quickly gaining popularity due to its simplicity of use and readability in comparison to XML. For Windows 8, a JSON.NET package can be added to a project which makes serialization (translating an object oriented data structure to a storage format) and de-serialization (translating a data storage format into an object-oriented data structure) very straight forward and simple from a coding perspective.
Review "Using JSON Formatted Data" section in the Lesson 7 Guide for detailed information and examples.
Writing Data to a JSON Formatted File
You used the DeserializeObject( ) method of the JsonConvert class to parse a JSON-formatted string into a List of objects. Likewise, there is a SerializeObject() method that functions to convert an object to a JSON-formatted string. You can use a StreamWriter to add records to a JSON data file. In the following example, you will use this technique to create an interactive address book in which the user can view the JSON data and add new records to the data file.
Review "Writing Data to a JSON Formatted File" section in the Lesson 7 Guide for detailed information and examples.
Practice
- Modify the Building Directory projects (Assignment 5A from Lesson 5) to read the data of the doctors (provider, practice type, and suite number) from a text file or JSON data file.
- After modifying the Building Directory projects from Lesson 5 (PRACTICE 1), create a separate app to add or modify the directory information stored in the data file.
- Create an app that allows the user to do the following:
- Enter and store data related to favorite songs (title, artist, and genre)
- Display a listing of all the song titles
- Display the record information for any selected title
Assignments
Complete the following:
- Quiz 7
- Assignment 7A (To Do List)
Summary
Unlike traditional Windows desktop programming, Windows Store Apps are limited when it comes to locations where data may be written. Apps may write data to the current folder of the installed app itself. With permission, a Windows Store app may access files in the user's libraries and write data to library files as well. Apps may also read and write data to the user's roaming session whereby multiple devices that the user is logged into may be synced. An app might also read data from a file on a web server, or read and write to a cloud account using Windows Azure. (This latter method is not demonstrated in this lesson.)
While XML is still a popular data format, JSON is becoming increasingly popular due to its simpler coding within a project. To use JSON data in a Windows 8 project, the Json.NET package must be added to the project. Objects may be serialized and de-serialized easily into JSON-formatted strings.

This work is created by the National Information Security and Geospatial Technologies Consortium (NISGTC), and except where otherwise noted, is licensed under the Creative Commons Attribution 3.0 Unported License